Blender for Conworlders (3.2)
If you've read the Planet Construction Kit, you've seen the section on creating 3-D objects. The main programs I talked about were Second Life, which is minimal, and Hammer, which is showing its age. So consider this a supplement: it gives the basics of modeling in Blender.Blender recently updated its UI, so I've redone this manual, partly so I understand it.
—Mark Rosenfelder, 2018/2022
Preliminaries
Blender is free, and available here.
You can render scenes right within Blender, but I mostly use it to create objects for Unity (the free game engine) or Second Life. I may do a basic tutorial for Unity sometime, but one nice thing about it is that you can include Blender objects directly, without having to export it to another file type.
One great thing about Blender is that a lot of people use it, so there is a lot of help available online. Google your problem and you can probably get a solution.
The installation should be pretty smooth; if you have problems see the last paragraph. (Note: I'm writing this guide using Blender 3.2.)
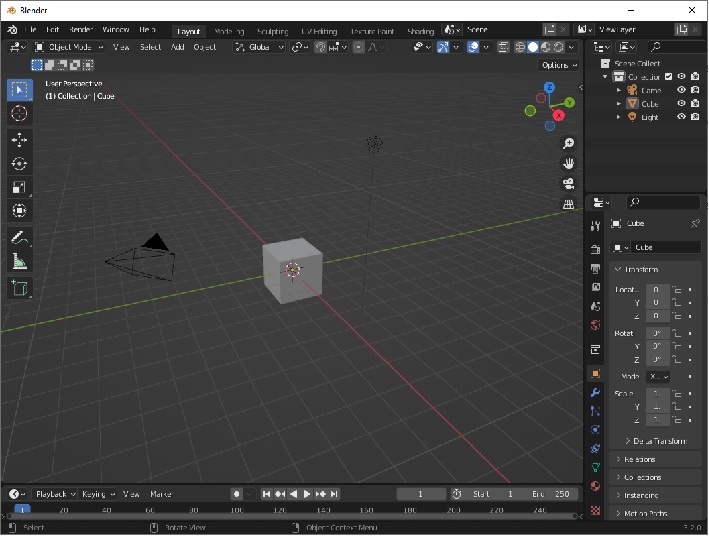
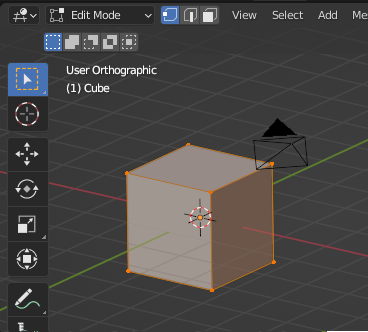
Run the program and click on the splash screen. You should see a screen like this:
I would suggest you play around with the program, as you could with a 2-D paint program, but there is a special rule that applies to 3-D graphics programs: nothing makes sense, nothing can be found by mere exploration, and nothing is the same between programs. Thus the need for tutorials, such as this page.
(This doesn't mean you can't explore. It's just that random exploration will rarely tell you what you need to know.)
One thing I won't explain— saving projects. The File menu does operate as you'd expect. The native format is the .blend file. To save in other formats, use the Export option.
If you want to start over at any point with the basic cube, select File > New > General.
Objects
Viewport commands
The first thing you probably want to do is get a look at your cube, to see it from different angles. That is, you want to make the viewport camera fly around. You do this by holding down the middle mouse button (MMB) and moving the mouse. Try it. As you can see, you can fly around all you want, but you stay about the same distance from the cube.To zoom the view, you scroll the mouse wheel up and down. Or for finer control, hold Ctrl, hold MMB, and move the mouse up and down.
It won't make much sense yet, but you can pan the camera by holding Shift, holding MMB, and moving the mouse. This will be a lot more useful when we have more objects. So let's create more!
Deleting objects
First, let's make sure that cube is selected. It starts out that way, but if you explored the program, maybe it's not. The selected object is outlined in orange. If it's not, left-click on it. (It used to be right-click. If you prefer that, change it with Edit > Preferences > Keymap. The very first option is "Select with Mouse Button".)Now let's get rid of it. Just hit Del, or X. With X (only), Blender will bring up a little confirmation message; click on Delete to delete the thing.
OH NO DON'T DELETE IT! Did you delete it? Just hit undo (Ctrl-Z). Undo is your friend. It's really easy to do something horrible and unexpected, and you can almost always undo it.
If you hit X and change your mind about a deletion, just move your mouse. The confirmation message will disappear, and the object will remain. (All of Blender's confirmation menus work like this. Sometimes this is unexpected— dialogs in other programs don't disappear when you mouse out of them.)
Creating objects
The easiest way to create an object is to let Blender create you a primitive.
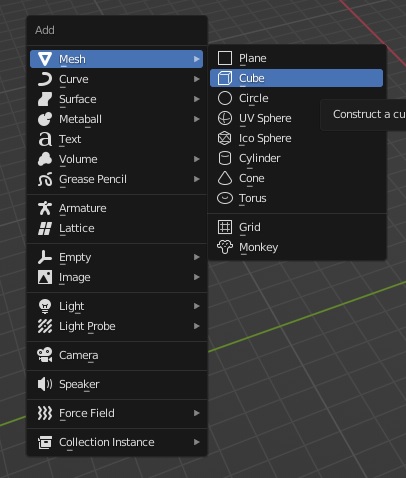
Objects are created at the 3-D cursor, which is the little white-and-red circle, not the mouse cursor. Position it using Shift-Right-click, then select a new primitive with Shift-A or the menu selection Add > Mesh.
Do this a few times with different Mesh options; now you have some objects. This is a good time to go back over the viewport commands, to make sure you can navigate around your scene. Try zooming in, then panning. Right-click to select various objects. Try deleting some objects and adding more.
Basic ops
For the basic operations, Blender provides multiple methods; as you get more familiar with the program you will probably gravitate to the keystroke methods, which are the fastest. But let's start with the toolbar in the upper left:
 |
These determine what happens when you left-click. From the top:
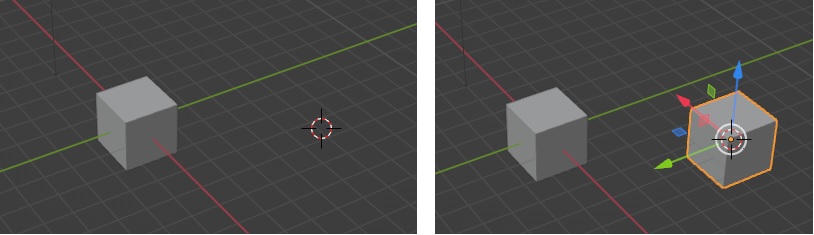
Pay attention to what mode you're in. E.g., in the picture we're in Move mode. |
Moving objects
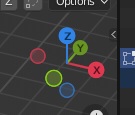
In Move mode (the third icon on the toolbar), there is a little set of colored axes on the selected object: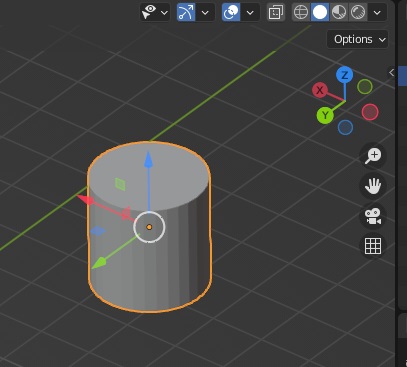
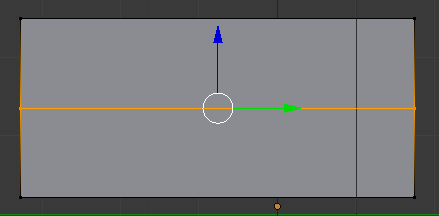
The arrows on the object are actually tools. If you left click on an arrow (and keep holding LMB), you can move the object along that axis by moving the mouse.
The little colored squares next to the axes are also tools; you can drag these to move in two directions at once. E.g. use the blue square to move the object in the XY plane.
Alternatively: press G. (For, uh, go? The program calls it "translation.") The border around the object turns white. Now you can move the object using your mouse. Left-click when it's about where you want. To restrict movement to one axis, use G then the axis name (X Y Z), then move the mouse. E.g. G Z will move the object only up and down.
Another essental tool: duplicate the selected object by pressing Shift D. This immediately puts you into movement mode, so you can move the new object.
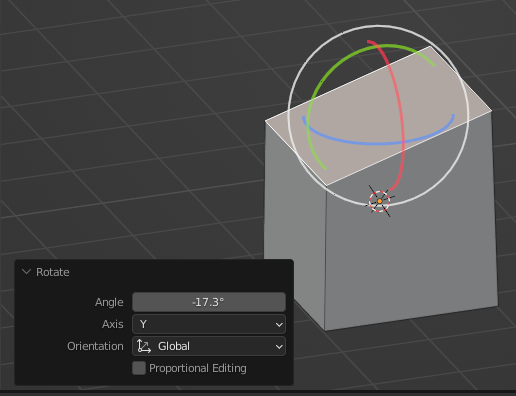
Rotation
The next basic operation is rotating an object. Select Rotate mode (fourth icon). As with Move mode, the colored bits can be manipulated. Here I've rotated the cylinder in the Y (green) direction: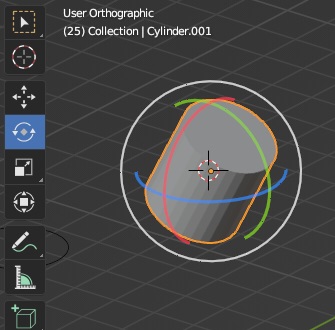
Or press R and move the mouse. The select object will rotate— probably chaotically and not in any direction you particularly want. Again, to rotate only in the Y axis, press R Z.
Changing size
The final basic operation is scaling, changing an object's size. Select Scale mode (fifth icon). Once again, click and drag the colored bits to scale the object. Here I've scaled a cylinder along the Y (green) axis: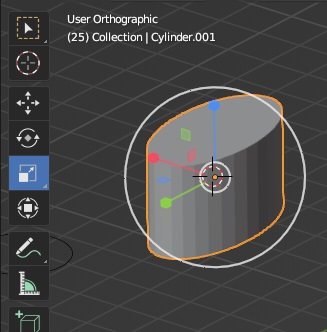
Special views
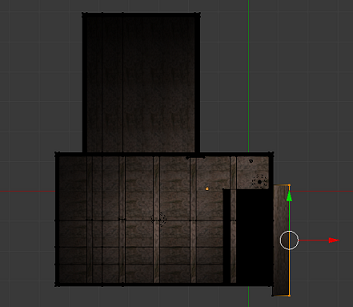
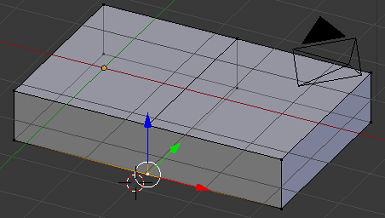
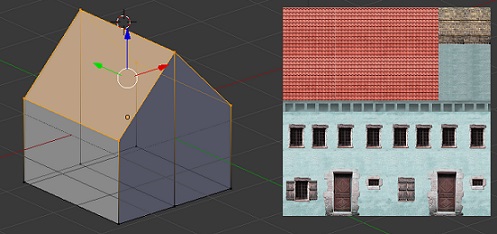
For most objects, you will very often want orthogonal views: overhead, front, side, etc. These are available on the number keypad.E.g., here's a little house:

You can also switch between these views by clicking the little colored axes in the top right. E.g. clicking Z gives you the top-down view; clicking the unlabeled blue circle gives you the opposite view, from the bottom.
So far we've been looking at orthographic view. You can also see a perspective view: hit Numpad 5 to toggle back and forth between them. Here's a perspective view of my house:
But surprisingly, for modeling you should use the orthographic view, because it doesn't distort sizes or make parallel lines into obliques. Once you are (say) making sure two objects properly fit together, you don't want the distortions of the perspective view.
The top left corner of the viewport names the current view— e.g. User Orthographic for user-chosen orthographic, Front Perspective for front perspective.
Edit Mode
Up to now we've been in Object Mode, which affects objects as a whole. For most work you'll actually want to be in Edit Mode, which lets you change individual points.You change the mode using the menu on the top left. Here's a picture showing the mode control, as well as how our cube looks like in Edit Mode. The whole cube is orange, and individual points are highlighted.
Faces, Edges, and Vertices
Objects in Blender, and in all your favorite video games, are made out of flat polygons. They look solid, but they are just an empty shell— in modeling terms, a mesh. Rounded objects are made up of lots of small flat polygons. You can see this in Blender if you create a cylinder or sphere.Modeling is modifying this mesh. To do this we need to be able to talk about meshes— specifically, parts of meshes. The important parts are
- vertices— the individual points that make up lines (and polygons)
- edges— lines that form the side of a polygon, almost always shared with an adjoining polygon. A polygon can be thought of as a closed circuit of lines
- faces— individual flat polygons
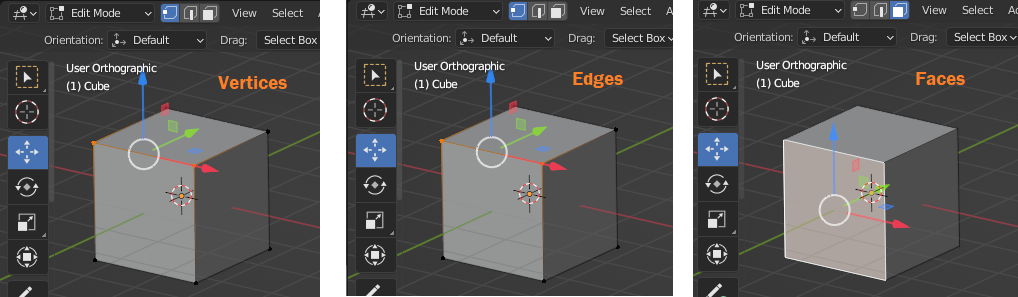
You can select multiple elements with Shift-LMB. To deselect a single element, click Shift-LMB on it again.
Manipulating stuff
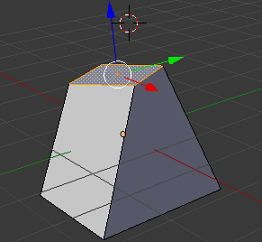
Often, progressing in Blender means learning about entirely new mechanisms you didn't know about before. Not this time! Manipulating elements is just like manipulating objects.Get yourself a fresh cube; make sure you're in Edit mode, Face mode, and Scale mode. (I've circled the controls for these things in the picture below.) Here I used the green control to shrink the top face in the Y axis.

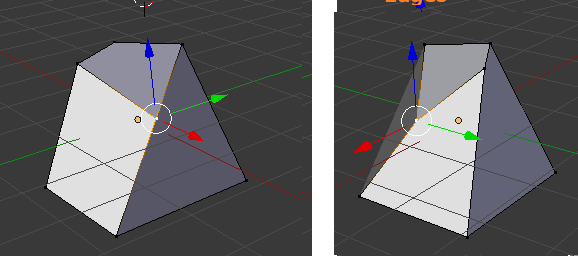
And here I took the same face and rotated it in the XY plane, by hitting R Z and moving the mouse. I could also use Rotate mode.
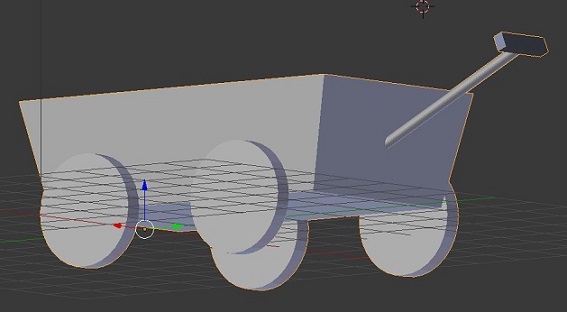
You can do a lot with what you already know, so try it out. Try creating multiple objects and make something, perhaps a toy wagon. (For the wheels, remember Shift-D for duplicate.)
Careful selection
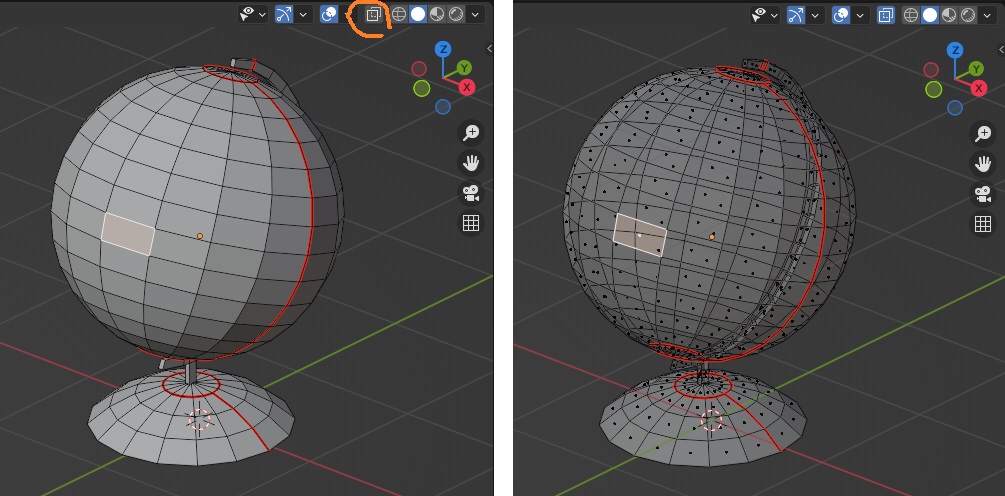
You may have already discovered that it's easy to select things you didn't mean to. Or you want to select all the vertices on one side of an object, thought you did, and discovered that you only selected the top or one side, and the object is now crazily distorted.First, let's get an X-Ray or wireframe view. There's an icon for this on the right side of the top toolbar (circled in orange below); the tooltip is Toggle X-Ray. Or press Alt Z. Click it a few times to see what it does. When it's active, you can see all vertices; when it's not, you get hidden surface removal. Here's a model of a globe in both views; note how the icon changes.
Don't forget that you can move the camera to make it easier to select what you want! If you've kept your object aligned with the axes, a top-down, front, or side view (Numpad 7, 1, or 3) will make it easier.
Some quick shortcuts: hit A to select all elements. To deselect them all, click outside the object, or hit Alt A. You can left-click and drag an area to select whatever elements are inside. You can repeat this to get more points.
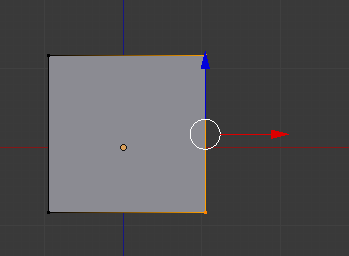
X-Ray mode is especially nice for geometric objects, like architecture. E.g., here's our cube, in a front view.
If you have a lot of elements, such as the faces of a cylinder, selecting them all can be tedious. You can select one, then Ctrl-Shift-RMB a face farther away, and Blender will try to select all the ones in between.
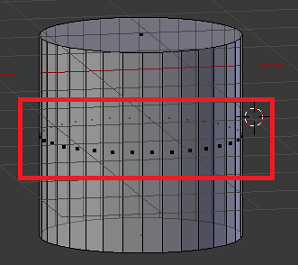
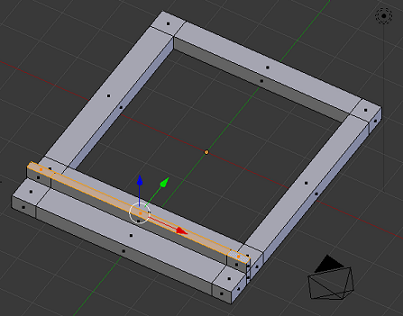
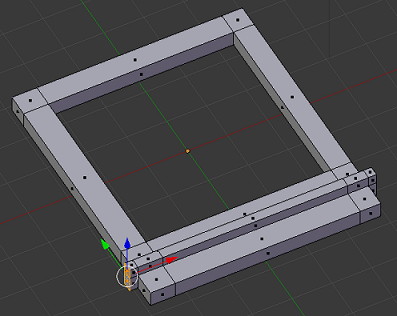
Even that may be tedious if you want (say) all the sides of a cylinder, but not the end pieces. So: move the camera such that you're looking at the side of the cylinder, and nothing is behind it. Make sure you're in X-Ray mode. Then hit B and select the centers— roughly the red box in the picture below:
Extrusion
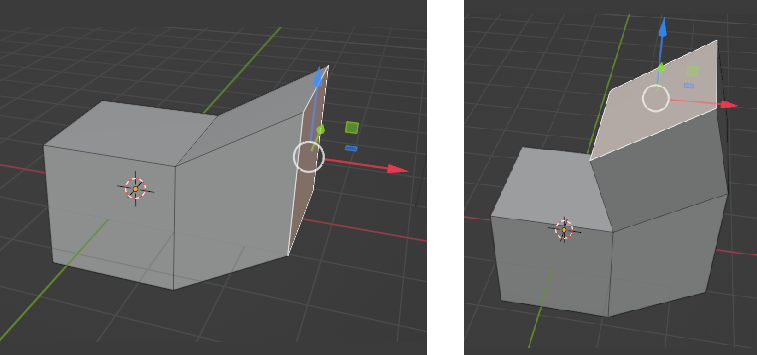
Extruding
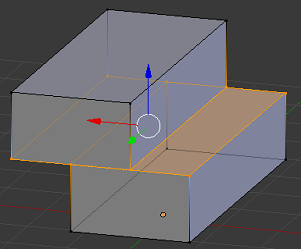
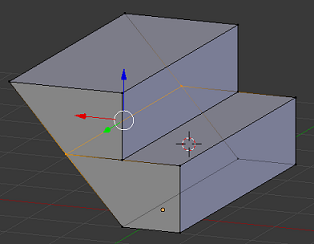
You can do a lot with simple objects— but "real" 3-D models are more complex. How are they made? Largely by extrusion. Think of pasta coming out of a pasta maker.Here I started with the default cube, got into Edit mode and Face mode, selected one side. Then I hit E and moved the mouse. This extrudes out that side, extending the 3-D object. Finally I selected the top face and extruded it upward:
Loop Cut
Another basic tool is subdividing a mesh. In Edit Mode, you'll see more icons along the left. One is Loop Cut. When you select it, then mouse over your mesh, Blender will try to draw a path around it, like this: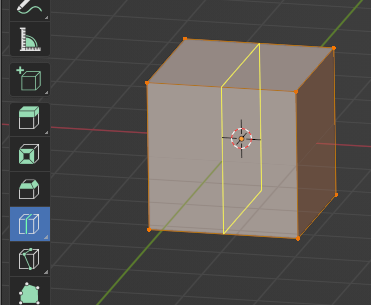
When you're ready, click the mouse, and new edges will be created along the cut. You can move the cut if you keep the mouse held down. (Once again, Undo if things get messy.)
Loop Cut is a mode, so you can keep cutting your object, adding more and more polygons. Don't forget to move back to something like Move mode when you're done.
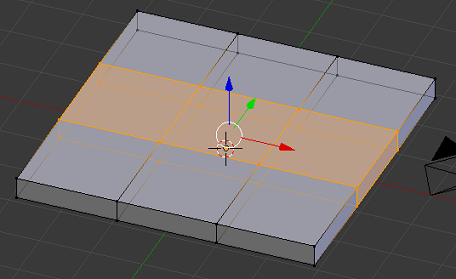
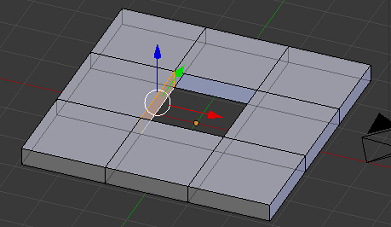
A windowpane
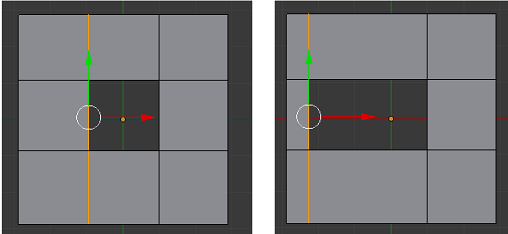
Let's build a window. Make a cube; make it bigger (S), then flatten it out in the vertical dimension (S Z).Then use Loop Cut to divide the object in three in both directions. It should look like this:
Now you can see the one below it, the one on the bottom of the frame. Do the same to get rid of that center square. Now you've got a frame with a hole in it.
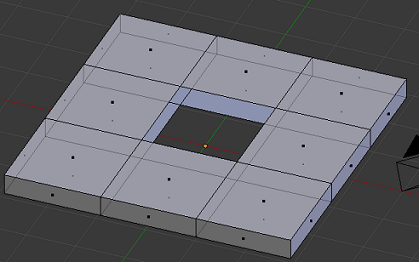
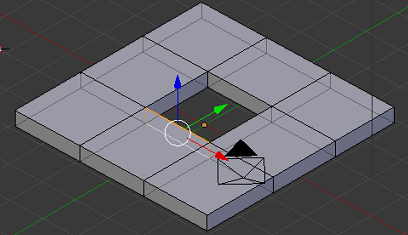
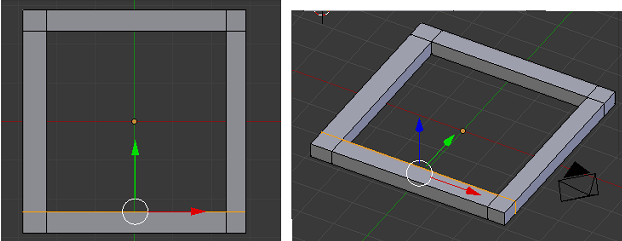
Select the three bottom faces on the bottom of the window. (On any side, really, but now it will become the bottom.) Hit E extrude just a little (i.e. move the mouse, left click). Do this again for a slightly longer distance.

(The proportions are a bit off— the sill and the board below it could both be longer. But in 3-D modeling, getting the overall shape right is the most important thing. You can easily change the proportions.)
Try it out!
You probably feel at this point that you don't know much (that's true) and there's a huge amount still to learn (also true). But it's also true that you can do a whole lot with what you know already. It's a matter of learning to apply the tools and methods you've learned, one small step at a time.For instance: can you figure out how to add crossbars to this window? You won't need any methods beyond the ones I've introduced.
Instead of a window, think of this structure as a simple room. Can you think of a way to add doors and windows to the walls?
Or: Start over with a cube. Use Loop Cut twice on each plane; now you have a cube where each side is divided into nine faces. Turn it into a rock. That is, move the vertices cleverly to make it broader on the bottom, less cubical, and more random.
Can you make a hemisphere? (Hint: you'll be using X to delete something.) Can you make a better rock starting with a sphere or a cylinder?
Or: Try to build that wagon again. But instead of having a big cube for the wagon body, give it a hollow interior. (Think how we created the window sill. Start with a cube subdivided two ways, like we did with the windowframe. What do you extrude to get the wagon body?)
Finally, remember that all the tools work on objects, vertices, faces, and edges. What happens if you extrude an edge? A vertex? What if you select some of those extruded vertices and hit F? This is one way to build— literally draw your vertices out into empty space and connect them to form faces.
Precision tools
Merging parts of the mesh
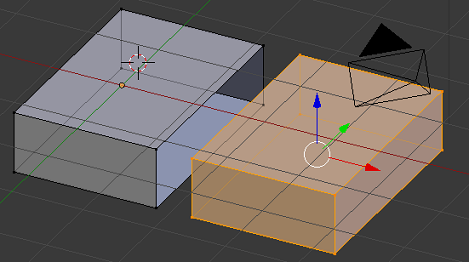
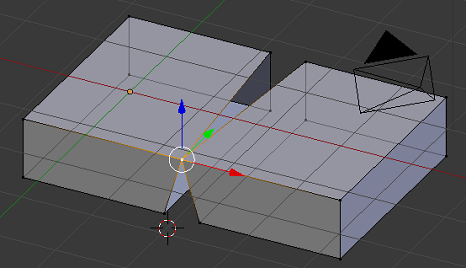
Another useful trick. Sometimes you'd like to join two parts of the mesh. E.g. let's say I have two cubes missing a face, and I want to join them together. I can move them real close, but there will still be a gap.
Aligning things
I'm making a staircase, and I've made huge progress: I've created a couple of cubes, resized them to look like steps, and moved them near each other. Only, nothing lines up. Is there a way to fix this besides zooming in really close?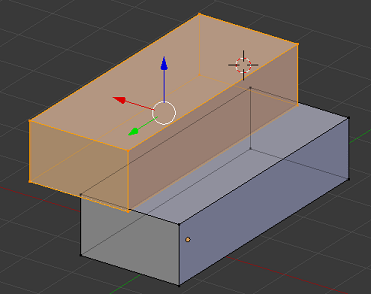
As an exercise, can you figure out how to move some points and align them to make stairs with a diagonal back, like this?
Creating things with precision
Just after you do an action, you have the option to refine it. There's a control in the bottom left corner of the viewport. E.g., after creating a sphere, expand this control to see some options. Segments and Rings determine how many faces the sphere is made with. The defaults are quite generous! Change them to 8 and 6: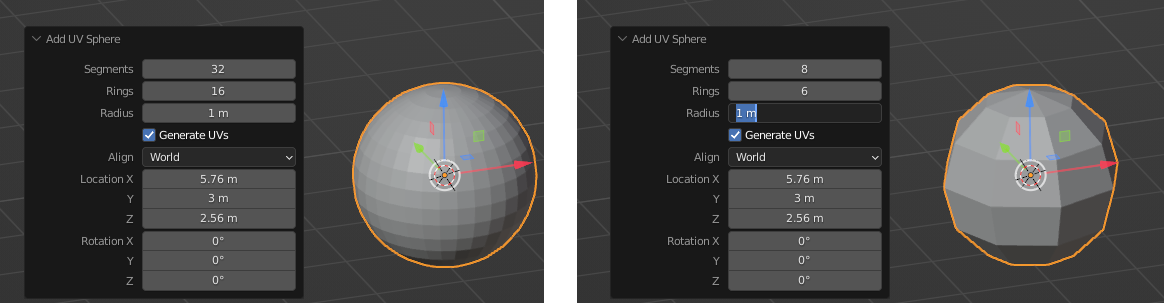
It looks blocky when you're concentrating on it, but if this was an element in a video game— say, a Christmas tree ornament— this is fine. If you look at pipes in video games, you may be surprised to discover that they have just 6 or 8 sides.
You can only change the last action; if you've gone too far, undo a few actions and start over.
The Size (S), Move (G), and Rotate (R) commands also allow more precision. E.g. you can say exactly what angle you want to rotate the selection:
Texturing
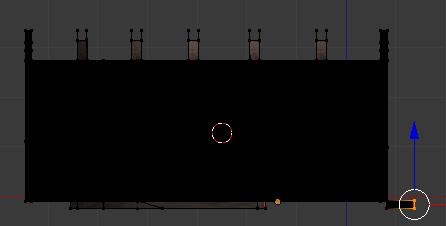
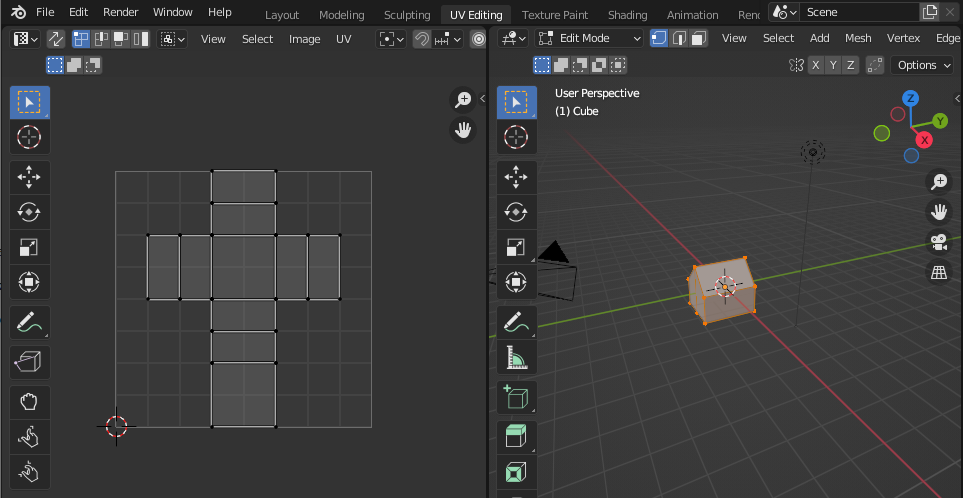
So far you only know how to make Blender's default gray objects. How do you give them pretty textures?It would take another long tutorial to fully explain this, but I'll show you the basics. Let's say you have this simple little house, and this texture. (The original is 1024 x 1024 pixels, since I wanted a fair amount of detail.)
Up to this point we've been using the "Layout" mode from the options at the top of the screen. Switch to UV Editing; you should see something like this:
Now we want to grab our image. This is all counter-intuitive, I know, but do all this:
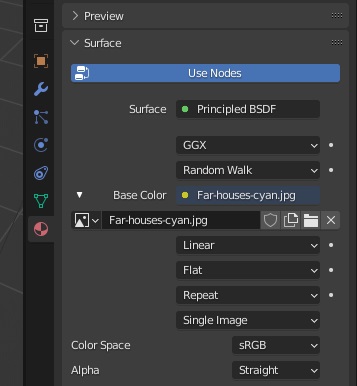
- There is a red icon on the right side of the 3-D Viewport whose tooltip is Material Properties. Click that.
- If the tab is empty, hit New.
- Click the yellow circle after Base Color.
- Select Texture > Image Texture.
- Now there's an Open button. Click that and select your texture image.
- After you select an image, the pane should look like this:
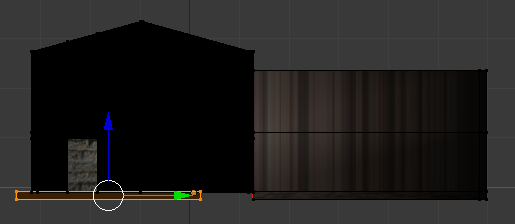
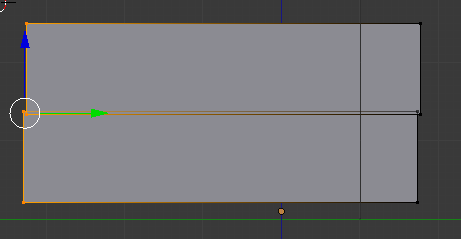
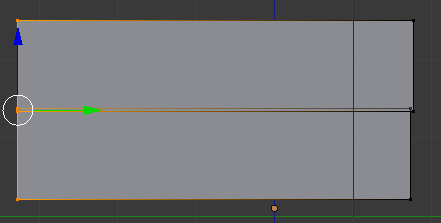
Select just one face of the roof. Hit U, and select Unwrap. You should see just one (possibly skewed) rectangle in the UV Map, as in the left picture. We want it to look like the right picture.
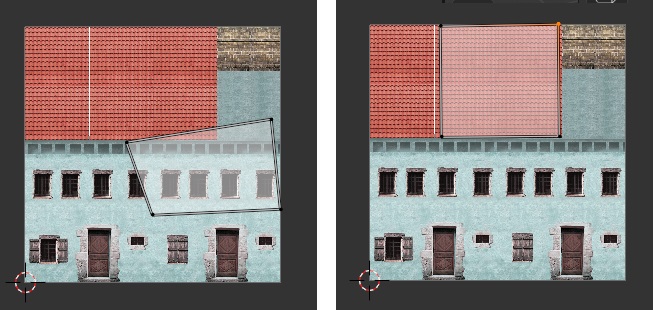
Note the four icons at the top of the window that determine whether you're selecting vertices, edges, faces, or islands (a set of faces). They're not quite the same as in 3-D Viewport. You can see them a couple pictures back.
In this case, the easiest way is to move each of the four vertices into position, one at a time, with G. Or you could work with edges, using S Y 0 to line them up horizontally, S X 0 to line them up vertically.
When you're done you should see the roof looking good in the 3-D Viewport:
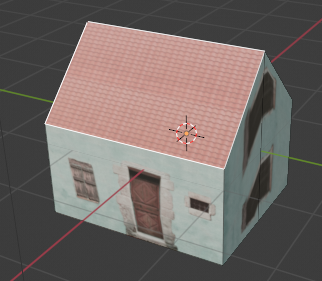
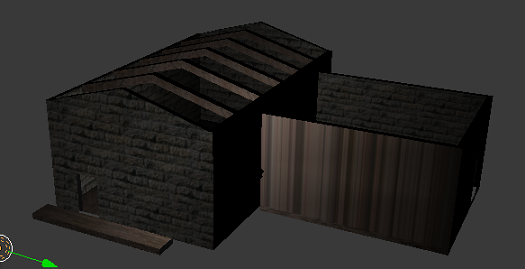
Here's what the little house looks like textured. It would be too simple for a house you can walk up to, but it would be fine for a house in the distance.
- You can select more than one face and edit them all at once. This can be useful for adjoining faces.
- You can get a face nicely aligned, then discover it's 90 or 180 degrees off. Go back to the UV editor, select all the points, and rotate (R) the whole face into position.
- It's better to do the UV maps early in the modeling process, before the object gets too complicated.
- Blender will create a default UV map for cylinders and spheres. Take a look at it to design textures to match, to save yourself work.
Multiple objects
I've talked about objects, but so far we've only had one of them. Objects are really collections of meshes; they're a way of organizing your scene. For instance, here's a model I made of a globe of Almea.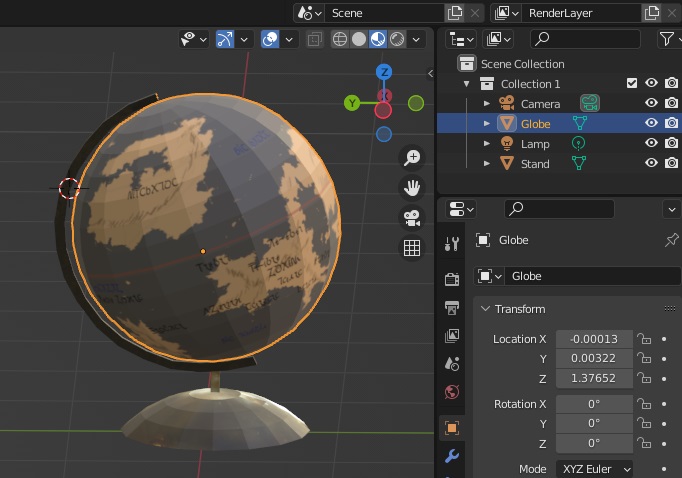
- Just to keep yourself organized.
- It facilitates editing. You can only have Edit Mode on for a single object. That's good, because it means that selecting vertices etc., or moving things, only affects that object.
- It's often convenient to have separate textures for each object. (The textures for the globe and the stand are quite different.)
- It can facilitate animation— e.g. if I wanted to make the globe rotate, I'd want to rotate the Sphere object and leave the Stand alone.
- In a game, you might make entire objects visible or invisible, as a fast way of altering the model.
To make part of an object into a new object: in Edit mode, carefully select the faces you want in the new object. (Make sure to rotate the camera to make sure you have everything you want, and nothing you don't want.) Hit P and click Selection.
You can also join two or more objects into one object. In Object mode, select your object(s), and hit Ctrl J.
To rename an object, make sure it's selected. Click the orange Object Properties icon (visible in the above picture, just above the wrench). You can now change the name in the edit field.
Bodies
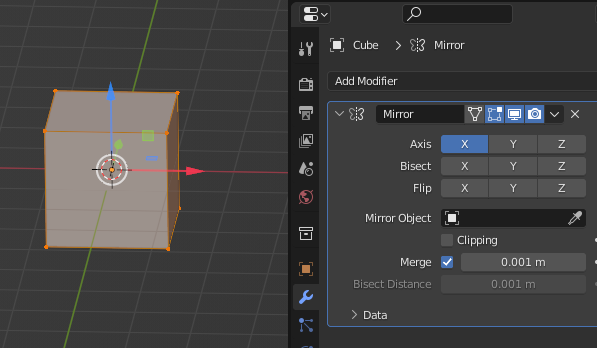
To sculpt bodies (to say nothing of animating them) would take another long tutorial. But as a teaser, let me show you some tricks to get started on a figure.Create a cube and go into edit mode. Make sure you're facing the front of the cube: the red X axis should point to the right, as in the picture below.
Click the blue wrench (tooltip Modifier Properties) on the right side of the window. From the Add Modifier menu, select Mirror. (It's in the second column.) Make sure X Axis is selected, as in the picture.

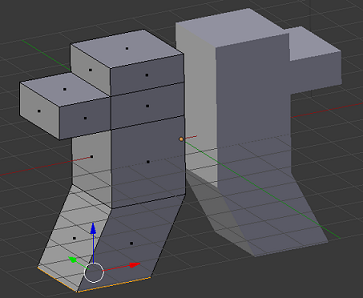
This is just enough to improve the figure quite a bit! You might see how far you can get. Give it a waist and a butt and a neck. Maybe extrude a foot. Make the limbs and the trunk round, by moving the edges inward. (This is most easily done from the top view, Numpad 7.)
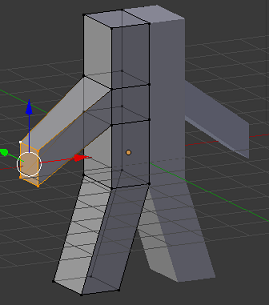
Here's my figure after ten minutes or so of work.

What's next?
Probably the Blender documentation.There are a bunch of tutorials online. Often you can get a question answered by Googling it— e.g. blender how to join two objects.
